Docker Compose | Docker for DevOps

Till now I have understood what a dockerfile is, created a dockerfile, and pushed it to the Repository. Let's move forward and understand Docker compose and perform a few tasks to understand what docker-compose is.
Docker Compose
Docker Compose is a tool that allows you to define and manage multi-container Docker applications. It uses a YAML file to define the services, networks, and volumes required for the application, making it easy to spin up and manage complex container-based environments.
You can find more information about docker-compose in the Official Documentation of Docker Compose.
Compose works in all environments: production, staging, development, testing, as well as CI workflows.
It also has commands for managing the whole lifecycle of the application:
Start, stop, and rebuild services
View the status of running services
Stream the log output of running services
Run a one-off command on a service
Working of Docker Compose
Using Docker-Compose is essentially a three-step process:
Define your app’s environment with a
Dockerfileso it can be reproduced anywhere.Define the services that make up your app in
docker-compose.ymlso they can be run together in an isolated environment.Run
docker compose upand the Docker compose command starts and runs your entire app. You can alternatively rundocker-compose upusing Compose standalone(docker-composebinary).
Key features of Docker Compose
Have multiple isolated environments on a single host
Compose uses a project name to isolate environments from each other. We can make use of this project name in several different contexts.
The default project name is the basename of the project directory. You can set a custom project name by using the -p command line option or the COMPOSE_PROJECT_NAME environment variable.
The default project directory is the base directory of the Compose file. A custom value for it can be defined with the --project-directory command line option.
Preserves volume data when containers are created
Compose preserves all volumes used by the services. When docker compose up runs, if it finds any containers from previous runs, it copies the volumes from the old container to the new container. This process ensures that any data you’ve created in volumes isn’t lost.
Only recreate containers that have changed
Compose caches the configuration used to create a container. When you restart a service that has not changed, Compose re-uses the existing containers. Re-using containers means that you can make changes to your environment very quickly.
Supports variables and moving a composition between environments
Docker Compose supports the use of environment variables to configure your containers at runtime. You can specify environment variables directly in the docker-compose.yml file or use an external .env file to manage them.
This makes it easy to configure your containers for different environments without modifying the underlying configuration file. Additionally, Docker Compose provides support for managing sensitive data, such as passwords or API keys, using Docker secrets.
Common use cases of Docker Compose
Docker Compose is widely used for various use cases, especially in scenarios where you need to manage multi-container applications and their dependencies. Here are some common use cases where Docker Compose can be beneficial:
Development environments
When you’re developing software, the ability to run an application in an isolated environment and interact with it is crucial. The Compose command line tool can be used to create the environment and interact with it.
The Compose file provides a way to document and configure all of the application’s service dependencies (databases, queues, caches, web service APIs, etc). Using the Compose command line tool you can create and start one or more containers for each dependency with a single command (docker compose up).
Automated testing environments
An important part of any Continuous Deployment or Continuous Integration process is the automated test suite. Automated end-to-end testing requires an environment in which to run tests.
Compose provides a convenient way to create and destroy isolated testing environments for your test suite.
By defining the full environment in a Compose file, you can create and destroy these environments in just a few commands.
Prototyping and Proof of Concepts
Docker Compose enables rapid prototyping and proof of concepts by allowing one to define and manage the required services in a single configuration file.
It helps in quickly spinning up complex environments with multiple containers, allowing developers and teams to experiment, validate ideas, and iterate faster.
In the next part, I am going to complete a few tasks to understand how Docker Compose works.
Anyhow if you want to install docker-compose and play around with it, I have a good resource from the official documentation designed to introduce the key concepts of Docker Compose whilst building a simple Python web application: Try Docker Compose.
Before moving on to performing the tasks, let us understand YAML.
YAML
YAML stands for YAML Ain't Markup Language
YAML is a human-readable data serialization format used to represent structured data in a simple and easily understandable way. It can be understood as a way to write down information in a format that both humans and computers can read and understand.
YAML is often used for configuration files, data exchange between systems, and defining complex structures. It's commonly used in various programming languages and tools, including Docker Compose.
YAML files use a .yml or .yaml extension.
The syntax of the YAML file is:
keyword: argument
Example of a YAML file:
name: Sneha K S
age: 23
email: sneha.ks@gmail.com
Tasks
Task 1: Learn how to use the docker-compose.yml file, to set up the environment, configure the services and links between different containers, and also to use environment variables in the docker-compose.yml file
Docker Compose can be installed as Docker Desktop (Docker Engine + Docker Compose), Docker Compose Plugin, or a Standalone Docker Compose.
I am going to install docker-compose as a standalone in Ubuntu. To install docker-compose, the following commands are used:
sudo apt-get update
sudo apt-get install docker-compose

To verify the successful installation of docker-compose, check the version:
docker-compose version

Once installed, we can start configuring services for the Docker engine by creating docker-compose.yaml file. Let us consider the sample docker-compose.yaml file provided to us. The file has the following information:
version : "3.3"
services:
  web:
    image: nginx:latest
    ports:
      - "80:80"
    depends_on:
      - db
  db:
    image: mysql
    ports:
      - "3306:3306"
    environment:
      - "MYSQL_ROOT_PASSWORD=test@123"
Let's break down and understand line by line of the above file.
version: "3.3"
This line specifies the version of the Docker Compose file format being used. In this case, it's version 3.3.
services:
Next part, we define two services: 'web' and 'db'. Each service represents a containerized component of the application.
web:
    image: nginx:latest
    ports:
      - "80:80"
    depends_on:
      - db
For the web service:
The
imagespecifies that thenginximage should be used for this service, with thelatesttag.The
portssection maps the host machine's port 80 to the container's port 80.With the
depends_onoption set, Docker Compose ensures that thedbservice is started before thewebservice. This means that when you start the containers usingdocker-compose up, thedbservice will be started first, and then thewebservice will start.
NOTE:
depends_on keyword is used for linking two containers.
The web service depends on the db service. Here's how the linking works:
The
webservice is defined first. It specifies a build context (./web), exposing port 80 on the host machine, and includes thedepends_onoption.The
dbservice is defined after thewebservice. It uses the MySQL image and sets the root password environment variable.
db:
    image: mysql
    ports:
      - "3306:3306"
    environment:
      - "MYSQL_ROOT_PASSWORD=test@123"
For the db service:
The
imagespecifies that themysqlimage should be used for this service.The
portssection maps the host machine's port 3306 to the container's port 3306.The
environmentsection under thedbservice sets an environment variable for the MySQL container. In this case, it sets theMYSQL_ROOT_PASSWORDenvironment variable totest@123. This password will be used for the root user of the MySQL database.
Once the services are defined, to start containers, use the following command:
docker-compose up

We can observe that db is pulled first and then the web.
Task 2: Pull a pre-existing Docker image from a public repository (e.g. Docker Hub) and run it on your local machine. Run the container as a non-root user (Hint- Use usermod command to give the user permission to docker). Make sure you reboot the instance after permitting the user. Inspect the container's running processes and exposed ports using the docker inspect command. Use the docker logs command to view the container's log output. Use the docker stop and docker start commands to stop and start the container. Use the docker rm command to remove the container when you're done.
Pull a pre-existing Docker image from a public repository (e.g. Docker Hub) and run it on your local machine
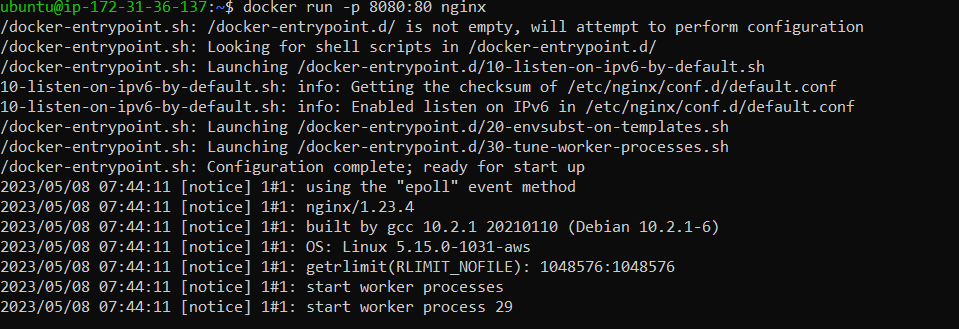
I am pulling the Nginx image. and running the container.
docker pull nginx
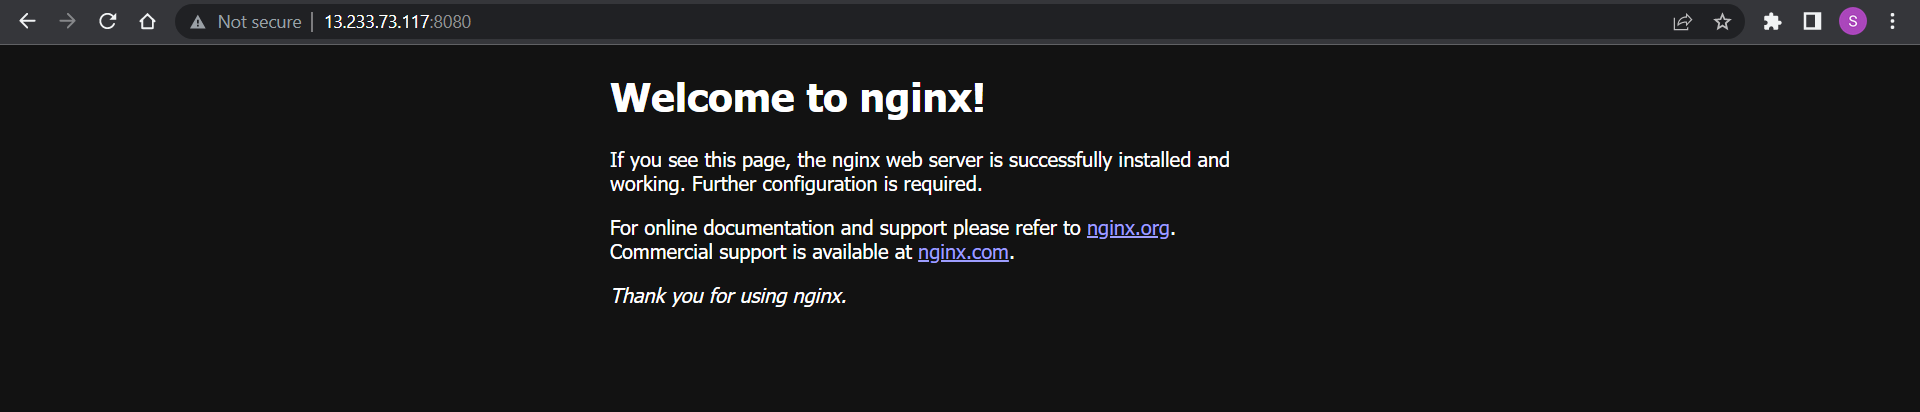
docker run -d -p 8080:80 nginx

Run the container as a non-root user (Hint- Use usermod command to give the user permission to docker). Make sure you reboot the instance after permitting the user
To run the container as a non-root user and use the docker commands without sudo, we need to give the user permission to docker using the following command and then reboot the system:
sudo usermod -aG docker ubuntu
sudo reboot
Inspect the container's running processes and exposed ports using the docker inspect command
The docker inspect command is used to retrieve detailed information about Docker objects such as containers, images, networks, and volumes.
docker images
docker inspect nginx
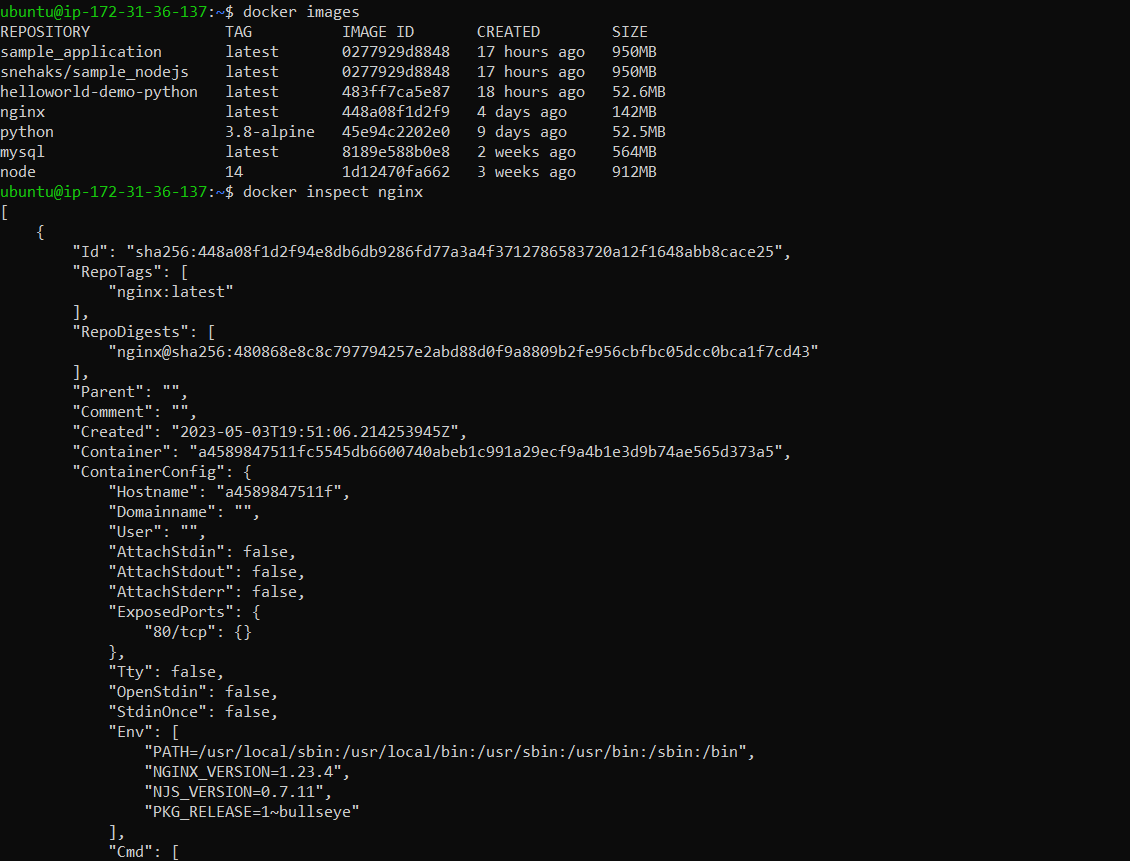
The output of docker inspect command has various details in JSON format. Look for the following sections to use custom formatting and inspect running processes and exposed ports:
"State"section: This section provides information about the container's current state, including whether it is running or stopped."NetworkSettings"section: Here, you can find details about the container's network configuration, including the IP address and exposed ports.
docker inspect --format='{{ .State }}' 1c9f2214db39

docker inspect --format='{{range $p, $conf := .NetworkSettings.Ports}}{{$p}} -> {{(index $conf 0).HostPort}}\n{{end}}' 1c9f2214db39

--format is used to format the output.
{{range $p, $conf := .NetworkSettings.Ports}}: This starts a range loop over the .NetworkSettings.Ports field. It iterates over each port mapping within the container's network settings.
{{$p}} -> {{(index $conf 0).HostPort}}: This template section displays each port mapping in the format <container_port> -> <host_port>. $p represents the container port, (index $conf 0).HostPort retrieves the corresponding host port.
{{end}}: This marks the end of the range loop.
Use the docker logs command to view the container's log output.
docker logs <container_id>

Use the docker stop and docker start commands to stop and start the container.
docker stop cont_id
docker start cont_id

We can observe that once the container is stopped, it is not up. As soon as we start the container, it becomes up.
Use the docker rm command to remove the container when you're done.
We cannot remove a running container. Hence, either we need to stop the container and then delete the container or perform the forceful removal of the container. Let's forcefully remove the container:
docker rm -f container_id

Throughout this blog, we explored the key features and common use cases of Docker Compose. If you have any questions or would like to share your experiences, feel free to leave a comment below. Don't forget to read my blogs and connect with me on LinkedIn and let's have a conversation.
To help me improve my blog and correct my mistakes, I am available on LinkedIn as Sneha K S. Do reach me and I am open to suggestions and corrections.
#Day18 #90daysofdevops


