Your CI/CD pipeline on AWS - Part-1
AWS CodeCommit

In the upcoming 4 blogs, we will be making a CI/CD pipeline on AWS with these tools: CodeCommit, CodeBuild, CodeDeploy, and CodePipeline.
In today's learning, let's deal with AWS CodeCommit.
What is AWS CodeCommit?
AWS CodeCommit
AWS CodeCommit is a version control service hosted by Amazon Web Services that you can use to privately store and manage assets (such as documents, source code, and binary files) in the cloud.
Similar alternatives are GitHub (well-known and widely used), and Azure Repos (a Feature of Azure DevOps).
Why CodeCommit?
With CodeCommit, you can:
Benefit from a fully managed service hosted by AWS.
Store your code securely.
Work collaboratively on code.
Easily scale your version control projects.
Store anything, anytime.
Integrate with other AWS and third-party services.
Easily migrate files from other remote repositories.
Use the Git tools you already know.
How does CodeCommit work?
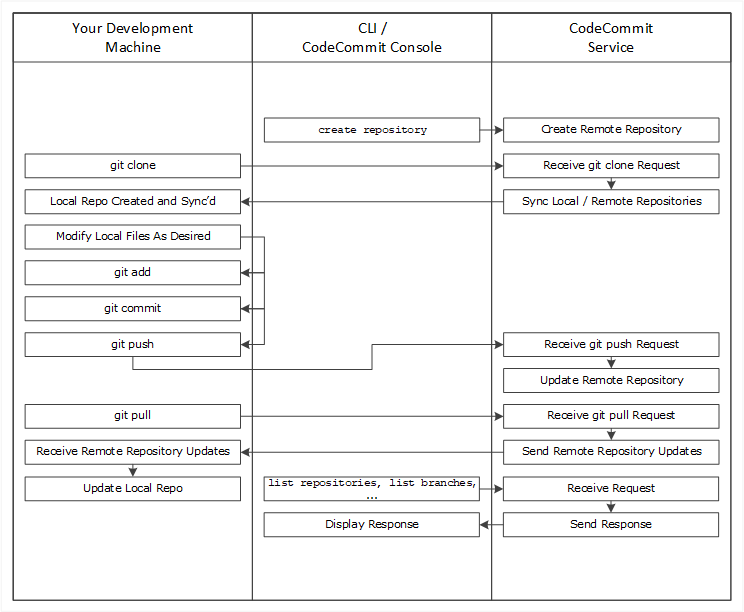
Use the AWS CLI or the CodeCommit console to create a CodeCommit repository.
From your development machine, use Git to run the git clone, specifying the name of the CodeCommit repository. This creates a local repo that connects to the CodeCommit repository.
Use the local repo on your development machine to modify (add, edit, and delete) files, and then run git add to stage the modified files locally. Run git commit to commit the files locally, and then run git push to send the files to the CodeCommit repository.
Download changes from other users. Run git pull to synchronize the files in the CodeCommit repository with your local repo. This ensures you're working with the latest version of the files.
Tasks
Task 1: Set up a code repository on CodeCommit and clone it on your local.
Pre-requisites:
You should have an AWS account.
Install and configure the AWS Command Line Interface (CLI) on your local machine.
Step 1: Generate Git credentials
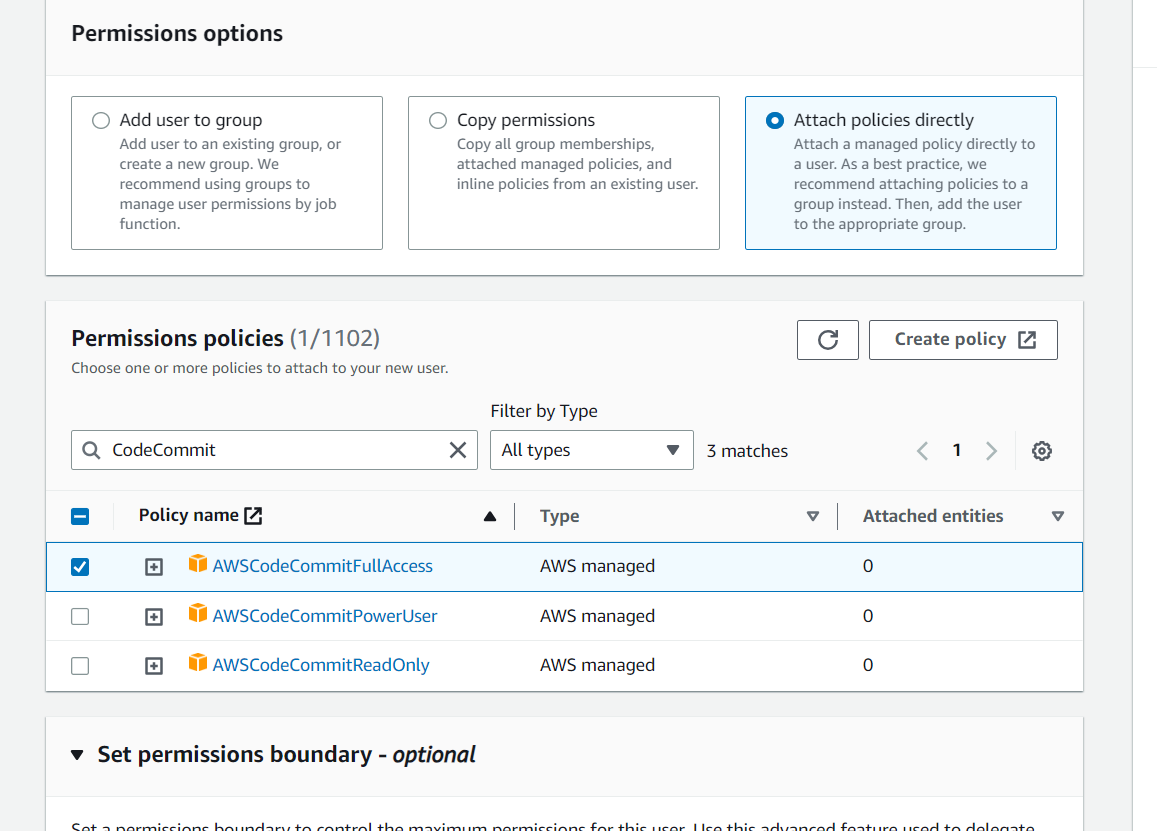
Go to IAM Service > Click on "Users" in the left navigation pane > Create a New User > Checkbox for Provide user access to the AWS Management Console - optional > Select I want to create an IAM user and give password > Click on Next.

In the next step > Click on Attach Policies Directly > Select the policy AWSCodeCommitFullAccess > Click on Create User.
Download the .csv file since this is the only time you can view and download this password.
Open the User you created > Go to the Security Credentials tab > Scroll down to HTTPS Git credentials for AWS CodeCommit > Select Generate Credentials > Download credentials and click on Close.
These are the Git credentials for accessing CodeCommit.
Step 2: Set up a code repository on CodeCommit.
Navigate to CodeCommit > Give your Repository a name > Click Create.

Step 3: Clone repository from CodeCommit.
In the dashboard, click on HTTPS to copy the URL.

At your instance terminal:
#git clone <https>
git clone https://git-codecommit.ap-south-1.amazonaws.com/v1/repos/codecommit-repo
For the prompt, give the credentials you downloaded earlier.

Go to the repo directory you created now using the cd command.

Voila! You have created an empty repository in AWS CodeCommit and cloned it to your local.
Task 2: Add a new file from local and commit to your local branch. Push the local changes to the CodeCommit repository.
Step 1: Add a new file from local and commit to your local branch.
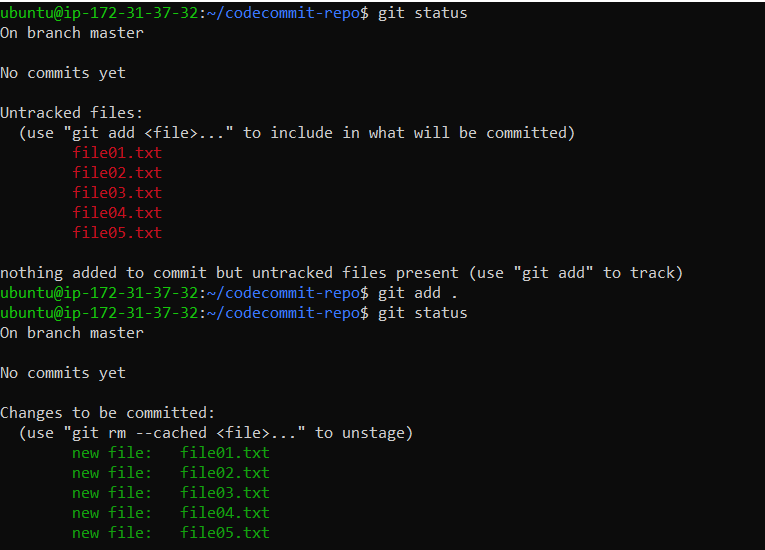
Create five files using:
touch file{01..05}.txt

Add these files to the staging area, using:
git status
git add .
git status
To add these in the local repositories history:
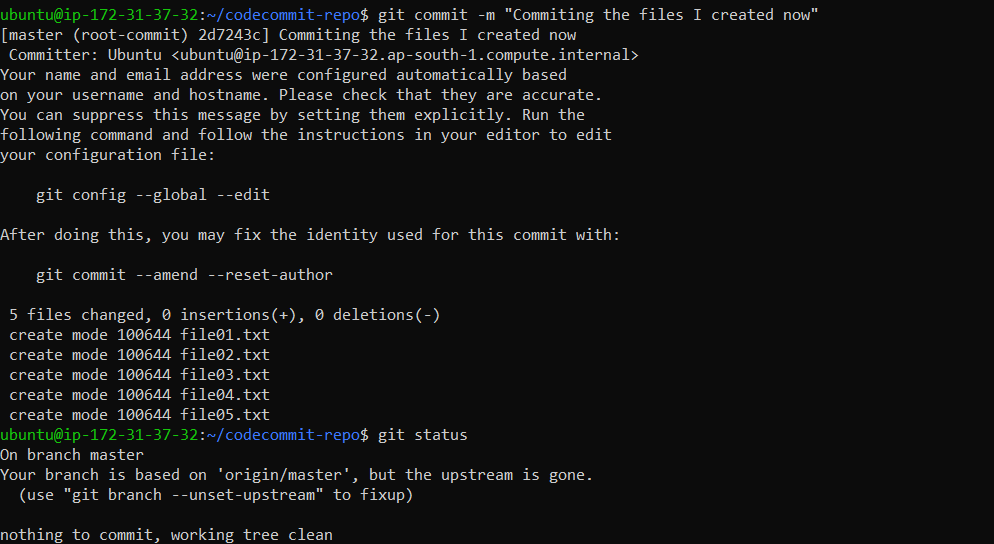
git commit -m "Commiting the files I created now"
Step 2: Push the local changes to the CodeCommit repository
Using the following command, push the changes from your local to the CodeCommit repository.
git push origin master

Verify that the files are pushed into the CodeCommit repository.
In the CodeCommit Repository > Repositories > Code.

And yay! You have pushed your local files to the CodeCommit Repository.
In this blog, I have created a repository in CodeCommit, cloned it to the local, and pushed the files from local to the CodeCommit. If you have any questions or want to share your experiences, please comment below. Don't forget to read my blogs and connect with me on LinkedIn and let's have a conversation.
To help me improve my blog and correct my mistakes, I am available on LinkedIn as Sneha K S. Do reach me and I am open to suggestions and corrections.
#Day50 #90daysofdevops


